
How to Create Your First AI Automation Workflow in 20 Minutes
A 20-minute beginner tutorial to create your first AI automation workflow using Zapier, Make, or n8n—complete with setup steps, prompts, and live testing.

- Read time
- 7 min read
- Sections
- 11
- FAQs answered
- 6
- Topic
- Automation
To create your first AI automation workflow in 20 minutes, pick one simple 3-step pipeline—such as turning new Google Form submissions or emails into AI-summarized Slack messages—connect your trigger app in Zapier, Make, or n8n, add an OpenAI or Anthropic module with a JSON prompt, and map the output to your destination app. You can build, test, and launch it without writing any code.
Most beginners stall on AI automation because they try to architect an autonomous multi-agent system on day one. When that fails, they assume automation requires a computer science degree. In reality, your first win should be small, visible, and useful: a single workflow that runs end-to-end in under half an hour and proves how triggers, AI prompts, and actions fit together.
Follow this 20-minute build step by step. Once you finish this starter project, you can expand using our guides on how to automate repetitive tasks using AI and how to connect your apps using AI automation across your wider stack.
What You'll Need
Pick one free automation account and create an API key from OpenAI or Anthropic. Note that an API key is separate from a ChatGPT or Claude web subscription—you only pay fractions of a cent per test run.
| Platform | Free Tier | Paid Tier | 20-Min Beginner Fit |
|---|---|---|---|
| Zapier | 100 tasks/month, 2-step Zaps (3+ steps require trial or paid) | Starts around $19.99/mo for multi-step Zaps | Cleanest interface for first-time builders |
| Make | 1,000 ops/month, multi-step scenarios included | Starts around $9/mo for 10,000 ops | Best free tier for 3-step AI workflows |
| n8n | Free self-hosted Community Edition; 14-day cloud trial | Cloud starts around $20/mo | Great if you want full control and visual node debugging |
| ChatGPT API (OpenAI) | Pay-as-you-go (add $5 minimum credit) | Billed per 1M tokens (~ $0.0005 per short workflow run) | Fast setup with built-in JSON mode in all three platforms |
For this 20-minute tutorial, Make's free tier or a Zapier Starter trial works best because both allow 3+ steps (Trigger → AI → Action) out of the box.
Step 1: Choose a 3-Step Starter Project (3 Minutes)
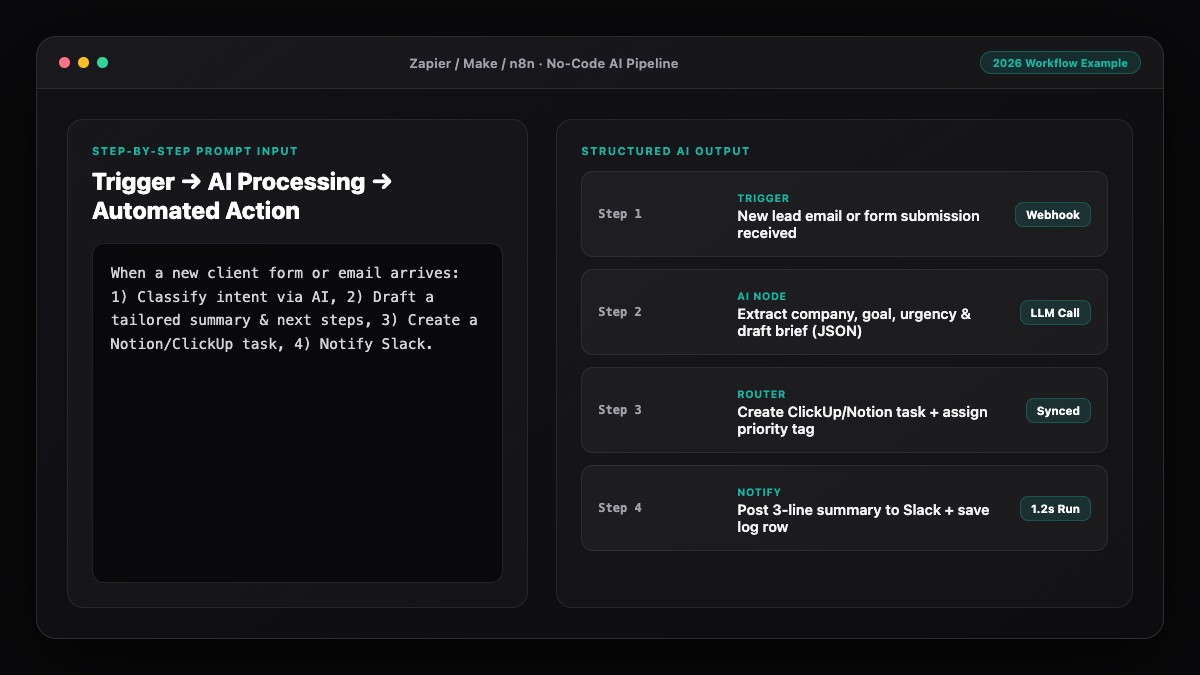
We will build a Smart Lead & Message Summarizer: whenever a new inquiry arrives (via Google Forms, Typeform, or a labeled Gmail message), AI reads it, rates its urgency, and posts a clean summary to Slack or Google Sheets.
- Step 1 (Trigger): New row in a Google Sheet or new submission in Google Forms.
- Step 2 (AI Step): OpenAI classifies urgency, summarizes the request in 15 words, and drafts a reply.
- Step 3 (Action): Send a formatted Slack message (or append the clean summary back into a Notion database or Google Sheet).
If you do not have a form ready, create a quick Google Form with three fields—Name, Email, and Message—and submit one sample response right now.
Step 2: Wire Up Your Trigger and Pull Test Data (4 Minutes)
Open Make (create a new Scenario), Zapier (create a new Zap), or n8n (create a new Workflow).
- Add your trigger module—for example, Google Forms: Watch Responses or Google Sheets: New Spreadsheet Row.
- Sign in with your Google account and select your form or spreadsheet.
- Click Run Once / Test Trigger so the builder pulls in your sample submission.
Confirm you can see the exact text of your sample Name, Email, and Message fields in the output panel before moving to the next step.
Step 3: Add Your AI Module and Paste the Prompt (6 Minutes)
Click the + icon after your trigger and search for OpenAI (ChatGPT) or Anthropic (Claude), then choose the Create a Completion / Message a Model action.
- Paste your OpenAI API key to connect your account.
- Select a fast, low-cost model such as GPT-4o mini (or Claude Haiku).
- Set Temperature to
0.1and enable JSON Object response format if available. - Copy the first prompt from the section below into the prompt box, and drag your trigger's
Messagepill into the placeholder spot.
Run just the AI step on your test data. You should see a crisp JSON block containing urgency, category, summary, and draft_reply. In Make or n8n, add a quick JSON Parse module (or enable automatic JSON parsing) so each key becomes an individual clickable field.
Step 4: Connect the Destination Action (4 Minutes)
Click + after the AI module and add your destination app—such as Slack: Create a Message, Gmail: Create a Draft, or Notion: Create a Database Item.
Map the parsed AI fields into the destination template:
- Headline:
[{{urgency}}] New {{category}} inquiry from {{Name}} - Body:
Summary: {{summary}}followed bySuggested Reply: {{draft_reply}}
Using Gmail Create a Draft instead of Send Email is a smart beginner habit: your AI prepares the response in seconds, and you keep one-click control before anything reaches a real person.
Step 5: Run a Live End-to-End Test and Activate (3 Minutes)
Turn on your workflow (or click Run Once) and submit a fresh test entry through your form. Within seconds, check Slack, Notion, or Gmail Drafts to verify the formatted output.
- Check that every field populated cleanly with no raw
{{curly_braces}}orundefinedvalues. - Test one messy submission (for example, a 2-word message like "Need pricing") to confirm the AI still returns valid JSON.
- Toggle the workflow status to Active / On.
Congratulations—you just built a working AI automation in 20 minutes! Next, explore how to scale this into a personal AI automation system or apply it across your company in our automate your business without coding guide.
Best Prompts to Copy and Paste
Use these beginner-friendly prompts for your first 3-step build. Replace the mapped variable with your trigger's text pill.
1. Starter Lead & Message Summarizer (Used in Step 3)
Read the incoming form message and return ONLY valid JSON with these four keys:
- "urgency": one of ["High", "Medium", "Low"]
- "category": one of ["Sales", "Support", "Partnership", "Other"]
- "summary": 1 concise sentence (max 15 words)
- "draft_reply": polite 2-sentence reply acknowledging their request

Message:
{{trigger_message}}
2. Quick Article / Newsletter Summarizer
Summarize the pasted article or email newsletter for a quick Slack digest. Return ONLY valid JSON:
- "headline": clear 8-word title
- "takeaways": array of 3 short bullet strings (max 15 words each)
- "worth_reading": "Yes" or "Skip" with a 5-word reason

Content:
{{article_text}}
3. Voice Note or Brain-Dump Organizer
Turn this messy note into structured tasks. Return ONLY valid JSON:
- "topic": 2-to-4-word project tag
- "clean_note": 2-sentence cleaned summary
- "next_action": single concrete next step starting with a verb

Raw note:
{{note_text}}
Common Mistakes to Avoid
- Confusing ChatGPT Plus with the OpenAI API: Your $20/mo ChatGPT web subscription does not include API credits. Create a developer API key and add $5 of pay-as-you-go credit.
- Forgetting to parse the JSON output: If you skip JSON parsing, your entire AI response arrives as one raw text block instead of separate
summaryandurgencypills. - Testing with fake "asdf" inputs: Always test with a realistic 2-to-3-sentence message so you see how the AI behaves on real language.
- Auto-sending emails on your first build: Start with Slack notifications or Gmail Drafts until you trust your prompt.
References & Official Sources
All workflows, pricing tiers, and feature capabilities in this guide were verified against the official platform documentation:
- Zapier Official Automation Platform (zapier.com)
- Make Official Visual Automation (www.make.com)
- n8n Official Workflow Automation (n8n.io)
- OpenAI ChatGPT Official Platform (chatgpt.com)
- Anthropic Claude Official Workspace (claude.ai)
- KwiqRank AI Workflow Integration Guide — Internal methodology for combining AI tools into repeatable business processes.
Final Thoughts
Knowing how to create your first AI automation workflow breaks the hardest barrier in no-code productivity: getting from zero to one working pipeline. Once you see a form submission or email transform into a clean summary and draft reply in seconds, every repetitive copy-paste chore on your calendar becomes an obvious next build.
Ready to apply this to marketing and operations at scale? Read our AI marketing workflow integration guide, or contact us if you want a partner to design and deploy custom AI workflows for your team.
Your questions, answered in plain English
Yes. A 3-step workflow—such as Google Forms to OpenAI to Slack or Gmail Drafts—takes about 20 minutes to connect, prompt, and test.
Make is great if you want a free tier that supports multi-step AI scenarios. Zapier has the simplest beginner UI, while n8n is best if you prefer self-hosting.
Yes, API usage is billed separately from ChatGPT Plus or Claude Pro, but adding $5 in API credit is enough for thousands of short workflow tests.
Check your AI module settings: set temperature to 0.1, enable JSON mode, and make sure you mapped the actual trigger text field into your prompt.
No. Route your first workflow to Slack, Notion, or Gmail Drafts so you can review the AI output with one click before ever enabling auto-send.
Once your first 3-step workflow runs reliably, add conditional routing (like urgency branches) or connect your calendar, notes, and inbox into a personal automation system.
Still curious? Send us your question and a strategist will get back to you.

Want this done for you?
We can put this guide to work on your website. Start with a free audit.
Get my free auditWritten by KwiqRank Team
KwiqRank is a digital marketing agency in Mumbai, India, working with UK and US businesses on SEO, GEO, AEO, paid media and websites. We check facts against official sources, and tell you when something is unconfirmed. Spotted a mistake? Tell us and we will correct it.
Found this useful?
Talk to us about your site
Tell us what you are working on and we will say plainly what we would do first.